Share Account Access

Investigators often want colleagues to collaborate or assist with their RPRS tasks – e.g., a technician to submit reports on their behalf. If you want such assistance, you can assign a colleague as an agent on your account. The agent will be able to view and, depending on permission settings you select, edit or submit documents for you. To use this agent function, both the investigator and the agent must have investigator accounts in RPRS.

To Assign an Agent
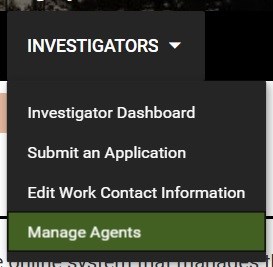
User's RPRS interface with Investigators menu item on the top bar and a drop-down menu that includes Manage Agents as the last item.
Manage Agents is an option in the Investigators menu.
To assign agent permissions, login to your account and go to the “Investigators” menu. From the drop-down list select “Manage Agents” at the bottom.
A user's Manage Agents page. There is a text box with an email address that has been entered and a pop up box with 3 radio buttons and options to set permission levels.
Interface to assign an agent on your account
On the Manage Agents page, enter the email address of the person who will be your agent. The agent must already have created an investigator account. The email address you enter must be the address that the agent uses for their account. If the addresses match, you will see a pop-up to select the level of permissions that you want to grant to the agent, as shown in the image to the right. The default is to view your account data like applications, permits, and reports. You may increase permission to edit your documents or to edit and submit them on your behalf. Make your choice and click the “Save” button.
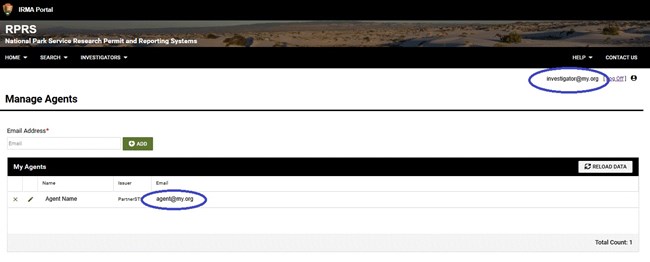
User interface showing the agents that an investigator has assigned to their account. The logged in user is called investigator@my.org as shown in the top right. The person assigned as agent is called agent@my.org as shown in the table.
Table listing users assigned as agents for an investigator.
In the example shown on the right, investigator@my.org is logged in -- see the top right corner of the page. They have assigned agent@my.org as an agent, as shown in the table. They can assign additional colleagues if they wish, and those people will be added to the table. The investigator can remove an agent or edit an agent’s permissions at any time by clicking on the corresponding links in the table.

To Act as an Agent

If someone adds you as an agent, you will be notified by email. Check your spam filter if needed. To become an agent, you must click the confirmation link in the email.

Once you are an agent, you can view and possibly edit or submit documents owned by someone else. To do so, log in to your account. In the top bar you will have both the usual “Investigators” menu option (for managing your own work) and a separate “Agents” menu option (for managing someone else’s work).
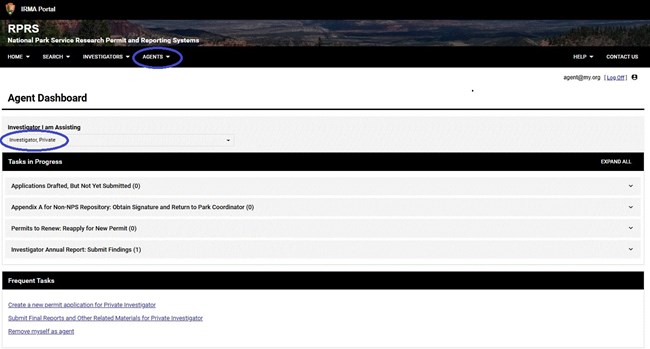
A user's Agent Dashboard that allows them to view and act on account information of another user. The logged in user is named agent. A field called "Investigator I am Assisting" shows they are looking at the data for another user named investigator.
The Agent Dashboard that allows "Agent" to see and act on account information belonging to "Investigator."
In the image on the right, Agent is logged in. When they click on the “Agents” menu option, they will open the Agent Dashboard and see information from another user’s account. The field at the top called “Investigator I am Assisting” indicates they are looking at Investigator’s account. The Agent Dashboard has the same layout as the Investigator Dashboard, but the tasks are now done on behalf of Investigator. If Agent no longer wants to have the agent role, they may end it by clicking the “Remove myself as agent" link.

Do you have questions about the software? The RPRS HelpDesk is available. e-mail us

Last updated: March 24, 2025

Tools

  • Site Index